Deploying Kubernetes 1.8 on Civo
This guide captures the steps involved in deploying Kubernetes on a single-host running on the Civo cloud. It borrows heavily from @alexellis’ Kubernetes on bare-metal in 10 minutes blog post, extending it slightly with the following:
- Configuring an Admin role for the Dashboard
- Deploying Heapster so that Dashboard graphs work
Create VM on Civo
For this guide I created an instance with the following settings:
- Size: Large
- Operating System: Ubuntu 16.04 LTS (Xenial Xerus)
- Initial User:
civo - Network: Default
- Firewall: Default
For the remainder of the guide I’m am remotely connected to the new VM instance as the civo user.
Deploy and Intialise Kubernetes
Install Docker.
sudo apt update && sudo apt install -qy docker.ioAdd the Kubernetes Apt repository and update the package list.
sudo apt update && sudo apt install -qy apt-transport-https && \
curl -s https://packages.cloud.google.com/apt/doc/apt-key.gpg | sudo apt-key add -

echo "deb http://apt.kubernetes.io/ kubernetes-xenial main" | sudo tee /etc/apt/sources.list.d/kubernetes.list

sudo apt update
Install
kubelet,kubeadmandkubernetes-cni.sudo apt install -qy kubelet kubeadm kubernetes-cniEnsure swap is disabled.
sudo swapoff --allInitialise Kubernetes. In this guide I’m deploying to Civo which is OpenStack based so I can pull the network address from the metadata endpoint. If you’re running elsewhere you should replace
$LOCAL_IPwith the private IP of your instance.The
--pod-network-cidrnetwork is the internal network used by Kubernetes and can be left alone unless it clashes with your private network.export LOCAL_IP=$(curl -q http://169.254.169.254/latest/meta-data/local-ipv4) sudo kubeadm init --pod-network-cidr=10.244.0.0/16 --apiserver-advertise-address=$LOCAL_IP --kubernetes-version stable-1.8If you encounter any errors during the init (for example timeouts) you can retry by repeating the last command adding the
--skip-preflight-checksargument.On completion you should see following:
[bootstraptoken] Creating the "cluster-info" ConfigMap in the "kube-public" namespace
[addons] Applied essential addon: kube-dns
[addons] Applied essential addon: kube-proxy

Your Kubernetes master has initialized successfully!

To start using your cluster, you need to run (as a regular user):

  mkdir -p $HOME/.kube
  sudo cp -i /etc/kubernetes/admin.conf $HOME/.kube/config
  sudo chown $(id -u):$(id -g) $HOME/.kube/config

You should now deploy a pod network to the cluster.
Run "kubectl apply -f [podnetwork].yaml" with one of the options listed at:
  http://kubernetes.io/docs/admin/addons/

You can now join any number of machines by running the following on each node
as root:

  kubeadm join --token xxxxxx.xxxxxxxxxxxxxxxx xx.xx.xx.xx:6443 --discovery-token-ca-cert-hash sha256:xxxxxxxxxxxxxxxxxxxxxxxxxxxxxxxxxxxxxxxxxxxxxxxxxxxxxxxxxxxxxxxxxx
Configure your users environment to point at this Kubernetes instance.
sudo cp /etc/kubernetes/admin.conf ~/
sudo chown $(id -u):$(id -g) ~/admin.conf
export KUBECONFIG=~/admin.conf
echo "export KUBECONFIG=$HOME/admin.conf" | tee -a ~/.bashrc
Deploy Pod Network (Flannel)
Apply the Flannel Pod Network resources and roles.
kubectl apply -f https://raw.githubusercontent.com/coreos/flannel/master/Documentation/kube-flannel.yml
kubectl apply -f https://raw.githubusercontent.com/coreos/flannel/master/Documentation/k8s-manifests/kube-flannel-rbac.yml
Enable Single Node Cluster
If you do not wish to configure additional hosts you can taint the master so that it will run containers without additional cluster nodes.
kubectl taint nodes --all node-role.kubernetes.io/master-
Check Cluster is Working
You can run the following command to check the status of the core Kubernetes components, you want to see all components in a Running/Ready state with no errors:
kubectl get all --namespace=kube-system
Deploy Heapster and Dependencies
Recent updates to the Kubernetes Dashboard have added a dependency on Heapster for Graphing. We can deploy it, its dependencies (InfluxDB and Grafana) and associated role as follows:
kubectl create -f https://raw.githubusercontent.com/kubernetes/heapster/master/deploy/kube-config/influxdb/influxdb.yaml
kubectl create -f https://raw.githubusercontent.com/kubernetes/heapster/master/deploy/kube-config/influxdb/grafana.yaml
kubectl create -f https://raw.githubusercontent.com/kubernetes/heapster/master/deploy/kube-config/influxdb/heapster.yaml
kubectl apply -f https://raw.githubusercontent.com/kubernetes/heapster/master/deploy/kube-config/rbac/heapster-rbac.yaml
Allow Heapster and its dependecies to start before proceeding.
kubectl get all --namespace=kube-system
If you already have Kubernetes and the Dashboard deployed but just want to enable Graphs, you can apply the resources above, but will need to replace your existing Dashboard pod. {: .notice–info}
Replacing kubernetes-dashboard-747c4f7cf-6br7f with your own pod below.
$ kubectl get pod kubernetes-dashboard-747c4f7cf-6br7f -n kube-system -o yaml | kubectl replace --force -f -
Deploy Kubernetes Dashboard
Deploy the Dashboard as follows:
kubectl create -f https://raw.githubusercontent.com/kubernetes/dashboard/master/src/deploy/recommended/kubernetes-dashboard.yaml
Grant Dashboard Full Admin Access
NOTE: Granting the Dashboard full admin access here is done as a convenience as I will be the only user of this cluster and the dashboard will only be exposed via SSH tunnel. {: .notice–warning}
Following the instructions in the Kubernetes Dashboard wiki, here, you can grant the Dashboard full admin access as follows.
$ kubectl create -f https://gist.githubusercontent.com/johnmccabe/acb1dfafa450080b2c6cfd37496d0135/raw/c0f6419a5e36c07d07845f6d6721e10a6ca2d081/dashboard-admin.yaml
Viewing the Dashboard
As we have bound to the private interface the Dashboard is not exposed to the internet, to view it from your local machine you must do so via a combination of an SSH tunnel and the kubectl proxy command.
From a terminal connected to the Kubernetes host start the proxy:
$ kubectl proxy
From your local machine, use SSH to connect to the Kubernetes host and create the tunnel to expose the proxy locally:
$ ssh -L 8001:127.0.0.1:8001 -N civo@<kubernetes host>
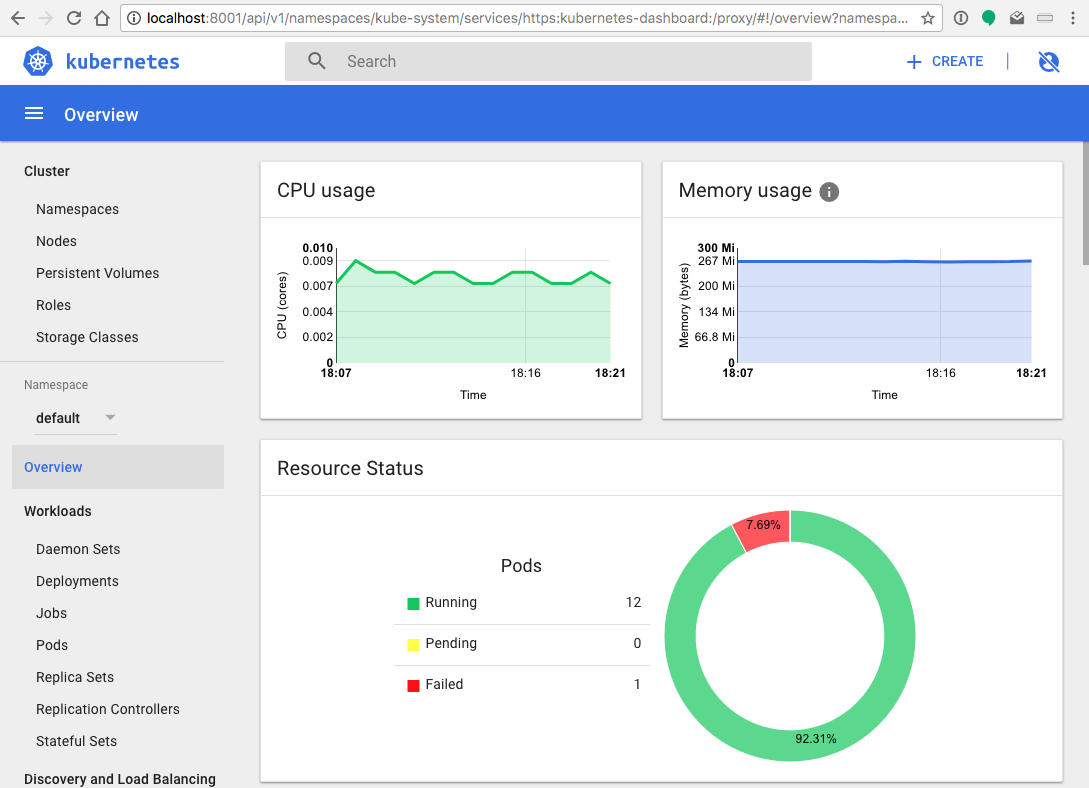
You can now connect to the Dashboard via the following proxy address.
Once you’ve populated your Kubernetes instance with some containers, you’ll see that graphs are fully enabled.
Next Steps
Head on over to the OpenFaaS project and follow the provided guide to deploy your own OpenFaaS stack.