Docker Swarm on Windows10 with HyperV
This guide describes how to run a Docker Swarm cluster with local registry on Windows 10 using Hyper-V. It fleshes out an extremely cut down set of instructions I’d previously posted in this gist.
Prerequisites
This guide assumes you already have the following.
- Windows 10
- Docker CE 17.09.0-ce or later
- 16GB RAM (I’ve not tested with less)
All the following steps should be carried out in Powershell.
Getting Started
Begin by setting environment variables with the names of the Swarm nodes, using variables here means we can just copy/paste commands from the rest of the guide.
$registry = 'swarm-registry'
$manager = 'swarm-manager'
$workers = 'swarm-worker-1','swarm-worker-2'
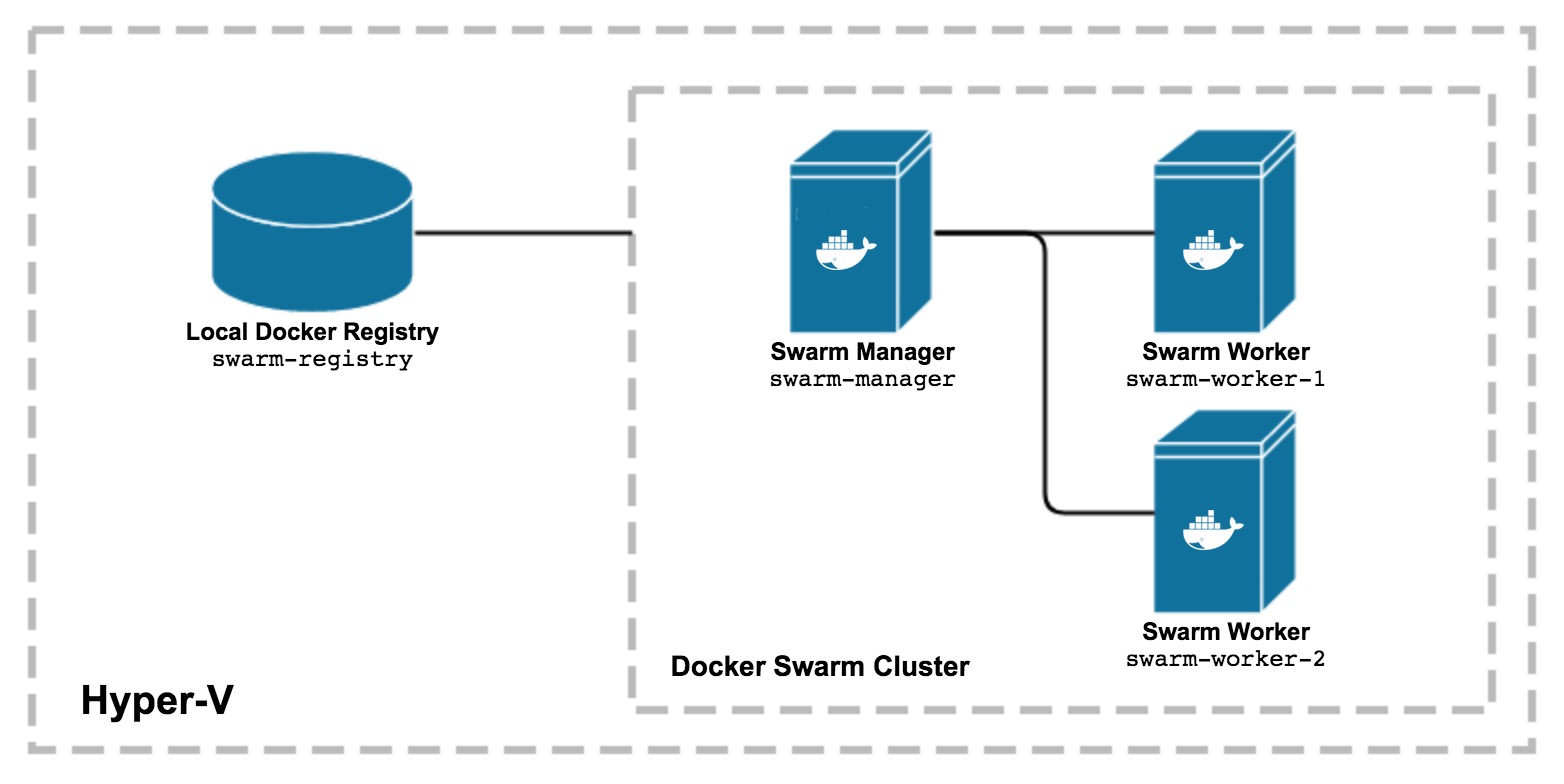
We will be creating the following Swarm with its own local Registry, if you wish to alter the number of Worker nodes then just add/remove entries in the $workers array above.
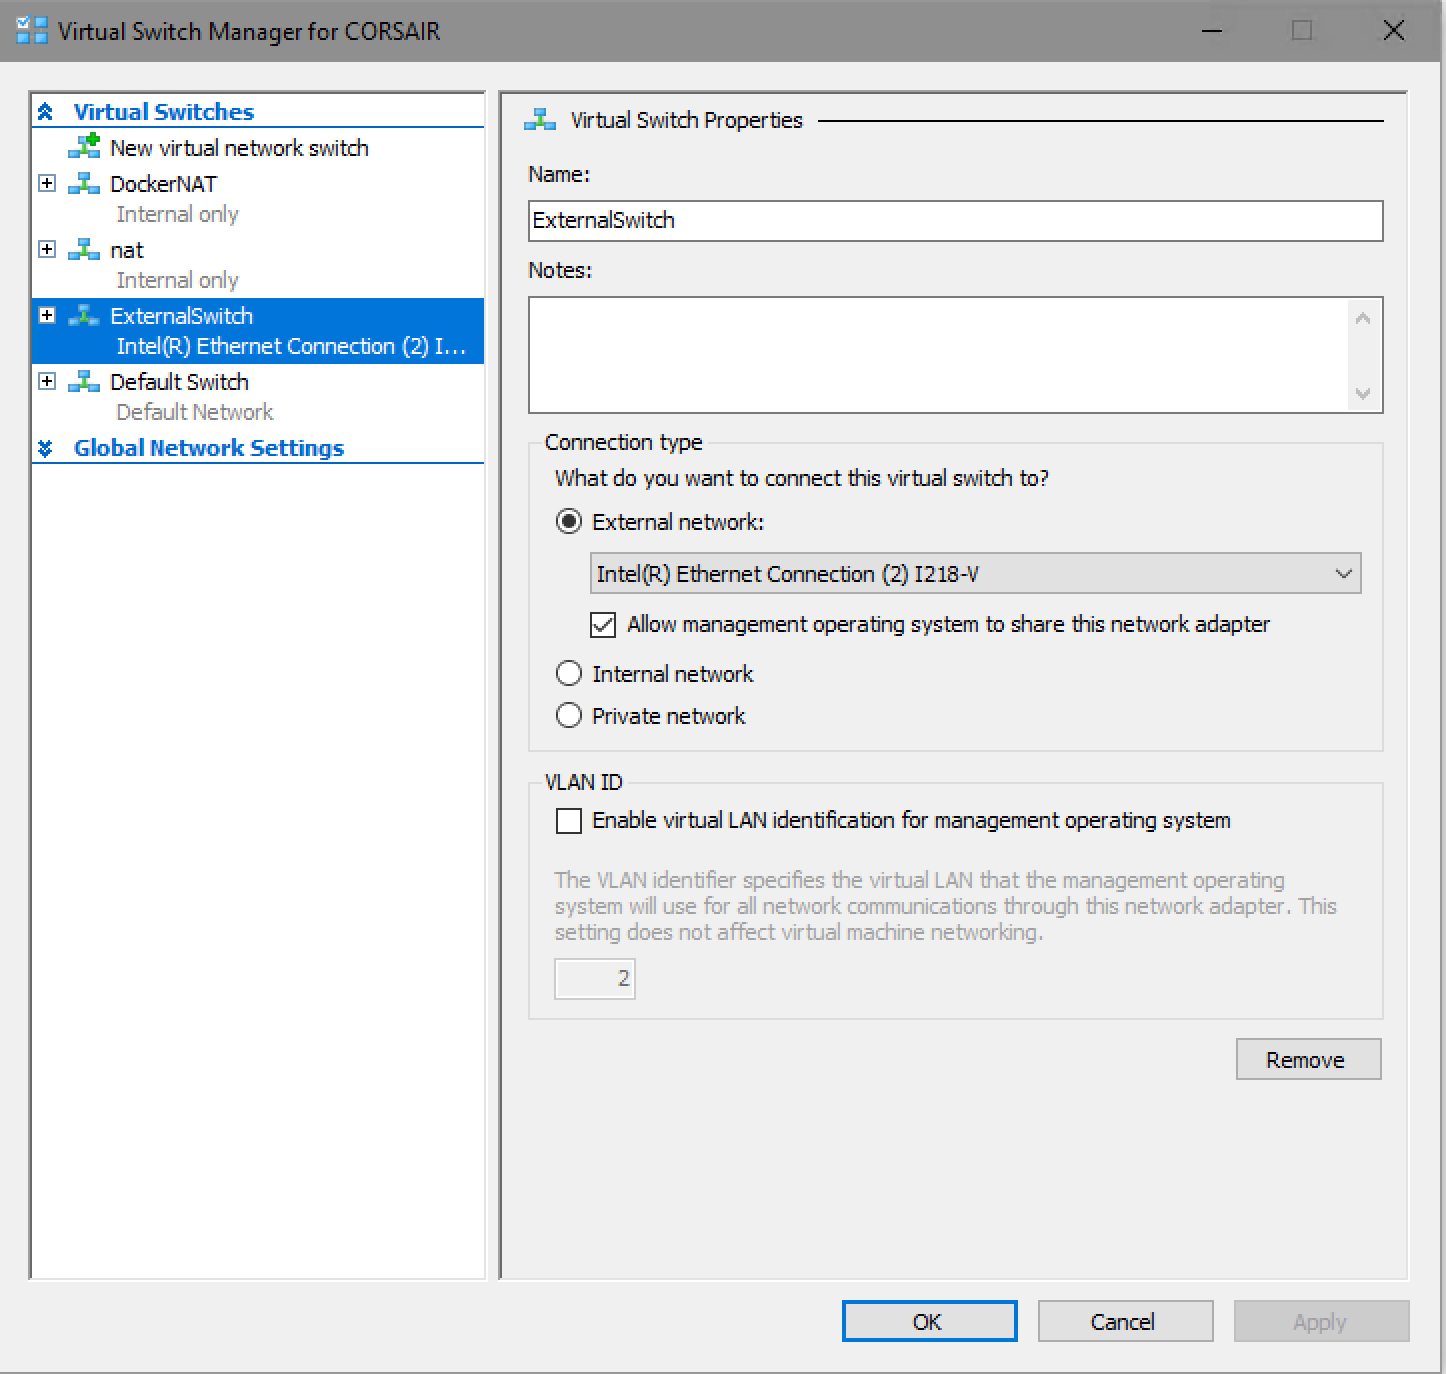
We also need to know the name of the Virtual Switch connected to the External network (since I want to be able to connect to the Swarm from other machines in my home network), for example:
<$hyperv_virtual_switch = 'ExternalSwitch'
Create Local Container Registry
In order to build images without having to push everything to Docker Hub we need to create a local registry which is accessible to all the Swarm nodes.
We create a single Docker machine called swarm-registry and run a registry:2 container on it.
docker-machine create --driver hyperv --hyperv-virtual-switch ${hyperv_virtual_switch} ${registry}

docker-machine ssh ${registry} docker run -d -p 5000:5000 --restart=always --name ${registry} registry:2
Assign the ip address of this registry machine to a variable for use in the next sections.
$registry_ip = $(docker-machine ip ${registry})
Create Docker Swarm Nodes
Here we create the Docker Swarm nodes, both the manager and all workers.
$swarm_nodes =  @($manager) + @($workers)

foreach ($node in $swarm_nodes) {
  docker-machine create --driver hyperv --hyperv-virtual-switch ${hyperv_virtual_switch} --engine-insecure-registry ${registry_ip}:5000 ${node}
}
Note that we set the --engine-insecure-registry argument pointing at the registry we created in the previous section, this is so that we can skip setting up TLS on the registry (you should never skip this in a production environment).
Initialise the Swarm Manager
With all nodes created we first initialise the Swarm on the manager node.
docker-machine ssh ${manager} docker swarm init
On completion this will print the command required to join workers to the Swarm, you don’t need to note this as we set up a variable with token in the next section.
Join Workers to the Swarm
We begin by creating variables with the Swarm token needed to join the cluster, and the IP address of the manager node
The worker nodes then join the cluster in the foreach loop.
$swarm_token = $(docker-machine ssh ${manager} docker swarm join-token -q worker)

$manager_ip = $(docker-machine ip ${manager})

foreach ($node in $workers) {
  docker-machine ssh ${node} docker swarm join --token ${swarm_token} ${manager_ip}:2377
}
At this point the Swarm is ready for use, congratulations.
Using the Swarm
You can then set up your environment to point at the Swarm by running the following command, using the docker command will now talk to the Swarm.
&& docker-machine env swarm-manager | Invoke-Expression
Running docker node ls should list the manager and worker nodes, they should all be in a Ready state.
docker node ls

ID                            HOSTNAME            STATUS    AVAILABILITY   MANAGER STATUS
lpb136in3vgm2hwebcwfs7w33 *   swarm-manager       Ready     Active         Leader
n0rn6iangjc84eux7xnstp6ad     swarm-worker-1      Ready     Active
p5k7u5u2d6sy8b93p7kfbyt2d     swarm-worker-2      Ready     Active
You can confirm that the Swarm is working as expected by creating a simple service running Nginx exposing port 80.
service create --name nginx --publish 80:80 nginx
Check that the service is deployed and running.
docker service ls
ID NAME MODE REPLICAS IMAGE PORTS
vpt5rbi6wmju nginx replicated 1/1 nginx:latest *:80-&gt;80/tcp
If you browse to the IP of any or the swarm nodes you should now see the Nginx landing page, you can get the IP address of a node using docker-machine ip, for example.
docker-machine ip swarm-worker-1
10.10.10.226
Using the Local Registry
The local registry can be used by prepending the registry IP and port 5000 in front of the image name when building/using that image. For example.
docker-machine ip swarm-registry
10.10.10.220

docker build -t 10.10.10.220:5000/my-image-name:mylabel .

docker run -d 10.10.10.220:5000/my-image-name:mylabel
Next Steps
Now that you’ve got your own Swarm Cluster you should head on over to the OpenFaaS Project and follow the guide to deploying OpenFaaS on Swarm.
When using the local registry with OpenFaaS, remember to set the function image name so that it begins with the address of the registry, for example:
provider:
  name: faas
  gateway: http://10.10.10.226:8080  # swarm node IP address (can be a worker or manager)

  ruby-echo:
    lang: ruby
    handler: ./sample/ruby-echo
    image: 10.10.10.220:5000/ruby-echo # use the IP of the local registry